Monday 7 March 2016

Group Project

Working on a group project was an experience I had not yet had while on the course, or really ever. I did enjoy the experience as you had to work together, jumping off and being influenced by each others idea and incorporating them to create one overall group project. 

The project brief was to design and/or create an interactive space or product. Although most of our team was product design students, with one architect, we decided to make an interactive space. 

Erefua - Google SketchUp artist
Esme -  Scriber to and about the project
Reece - Model Maker
Jade - Lighting Technician and Researcher 

After roles had been situated within and among the group, our next aim was to figure out whether to make a product or space which ended up being a space. 

Our first part of the brief was to create a moodboard full of images that each held some type of interactive space. A lot of the images gathered by our group included interactive lighting or just lighting that was a bold feature of the space. A lot of the images from our "cool hunting" moodboard were open spaces that had been adapted to hold certain features. 

I a key interest of mine from the moodboard was the high-line which is based in New York. This I had a lot of interest in as I visited it in early 2015. The high-line is an old railway track that runs through mid-town Manhattan. Though it is not used for its previous functional use as a railway, it has been developed into a walkway bridge, holding an open air theatre and a large gardening community that plant flowers all throughout the high line. I thought this was a great example of an interactive design and one that has been redeveloped from a previous function. 

As a group we decided to make an environmental space that was interactive and allowed people from many communities to gather together. I think a key area that we found hard to do as a group was come up with initial ideas so we ended up bouncing further ideas off  of each other until we came up with a base as to where to put our project. We decided a park or open green-space that would serve as an underground park. We used the High Line in NY as our key point of reference almost creating something similar but underground. As a group we felt that building this space underground was a good use that way not to disrupt the scenery and greenery within an area especially within large cities such as London - therefore keeping the project somewhat environmentally friendly. 

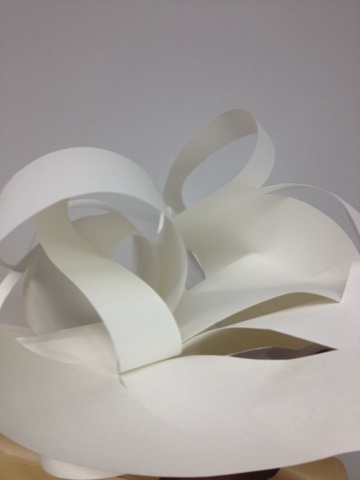
The main section of our concept was centred with trees that was covered by a dome shape with holes to let natural light through. The entrance of the underground park was at the centre of the dome which held an atrium. This then split into four walkways which at the end of each one held smaller gathering areas where people could interact. 
As can be seen from the model below, the trees let light through gaps in the roots allowing natural lighting into the spaces below. We added sculptures of contrasting colours to the scenery which was influenced by Chis Chihuli's glass sculptures - this allow allowed in a large access of light. I think the sculptures were a nice touch as they carried on through the ground almost working and a natural chandelier when underground. 

My group and I as well as creating a cross section of the main entrance also created the walkway which there would be four of leading to four interactive spaces. This I really enjoyed as it was a mixture of product and interior rather than architecture and the exterior. I felt that the walkway was small but effective holding its purpose. The walkway holds small circular podiums which are all one colour. But once talking to one of the tutors we decided to develop so that when you walked passed one, it would change colour making it more interactive. 


Overall, I felt the group project was challenging as you are working with many peoples ideas but also felt this was one of my most positive and better completed projects as in group situations you have more people working on a project so more can be achieved within a smaller amount of time. Sure we faced our difficulties agreeing on some situations and outcomes but that is all part of the learning process. If I could change or adapt anything, it would possibly be the scale and to have made a larger on. I would have also had a better display of the staircase and how you got underground. 
3r's
We have each been given a random item from the pound shop which we are to make a product from within two weeks. We have been allowed to do anything with our item from attach it to other items all the way to cutting it into small tiny pieces. 

I have toothpicks, my initial idea was to make a building construction but I know that product design and fine art is more my forte than architecture. I decided to play about and get a feel of the toothpicks understanding how rigid they were and how much pressure they would take before breaking - depending where on the toothpick that the pressure was placed. 

I started off with some initial line drawings before moving to the photocopier where I dispersed the toothpicks on the copier. I experimented with the scale, the proportions, colour and dispersion of the toothpicks creating different patterns. During this time I experimented a lot with my sketches, the forms and shapes by using a vast application of drawing materials. 
At this point I decided it was time to start trying to recreated some of these drawings in 3D. I took to using my toothpicks and a hot glue for quick and accurate use. I also experimented freely with the toothpicks and different ways you could join them together creating obscure curves and shapes. 
When making these structures, I had an automatic connection to Antony Gormley’s use of aluminium rods to create structures which led to him becoming a source of inspiration for my outcome. 

I then took to pointers where once searching Antony Gormley, I came across a range of artwork using lines from lighting, to accessories to interior structures. I was definitely intrigued by the 3D shapes they made from lines and the depth you could achieve in the model. I appealed immediately to the lighting designs as they had depth but both had a form and function, the shapes formed by the lines were very striking and led to me look further into other forms that could be made. Along the way I came across arc’s that had been made using just lines of wood - I love the concept of being able to form curves from straight lines, as it adds a whole other dimension to designs and shows that we do not have to conform to basic methods to make shapes. 
The idea of my project came from the image I found of shapes made being made from lines, but, it was not wood, the structure was made from long lines of thread joined together. 
I immediately from seeing this came up with making a similar concept out of toothpicks. But instead the chair made from toothpicks in the centre would grow to form an arc over the top made of toothpicks.
I drew my initial ideas which I was not too pleased with as I felt the depth of my idea could not be seen. 
Upon developing my idea I thought it would have a better statement if you could look from above and down into the installation, so within the room created a muezzin level which you could stand on and look down into the work. 
In further development I decided I wanted the audience to be engrossed with the art at first sight so decided there was one door you entered and left out of which was shorter than the average door. Meaning the audience would have to crouch through the door when entering, I felt this would mean when they walked in they would be a lot smaller than the work, therefore the work engrossing them. 
The final outcome message of my work was to express the stress and pressure’s felt by oneself as well as the pressures others put on us. This I felt was expressed by the over arching dome which represented us almost feeling trapped within a space and oppressed as well as the fragility of oneself. The fragility of a person could be seen in the manner that no one could sit on the chair without it breaking as well as hurting yourself. 
I was very pleased with the outcome of my project and I found sketchup to be hard work especially when not working against a background as well as at times making the model and getting such thin surface areas to stick together. 

Monday 7 December 2015

Selfie Booth

We had a week project where we worked with another parter to create a selfie booth of our choice. This project was led by degree tutors who helped us each by starting off with a mind map as to different selfie booths you could have before then moving onto a target audience and what would be appropriate for our target audience.


I enjoyed this project as it was only a week long which made me very aware of my time and how much I had to do within terms of research and development with that week.
It made me a team player and although my partner and I would often have different concepts I think it made our project work better as we collaborated our ideas to make one final outcome.
It would good to have a project that was fully based on the consumer outcome as it made me more aware of how important research and questionnaires are in making a project.
Emma and I were the only group to make three photo selfies within one project which I am proud of.

I think for prototypes these were great products but of course I would make further developments for the final thing.

Fixtures and Fittings

Carrying on from last week, we had to develop  our sketches into actual products or architectural design.

I developed this for the cable tie lines into a chair


I developed the paper curved forms into an architectural pavilion.


I made a collage with left over prints of my cable ties and decided to make it into a cracked mirror with frost over the top.  I enjoyed doing this because it showed my that one mans scrap was another mans forturne.


I chose the paper based one as I felt there were so many angles I could approach it from such as turning it into a hairband/scrunchie, a door handle, jewellery, the basis of a shoe design.

I initially started off by seeing it as an architectural design for an outside space, almost as though a pavilion with different sections, entrances and exits to it. But then through development I decided against this and chose to go with a chair design.

When using CAD I found it hard to make the model on photoshop and found that my outcome did not look very realistic when placed in a normal environmental setting which is something I have found that I need to work on.
But I enjoyed the task as I found myself researching about different types of chairs such as the evolution timeline on the design museum website, to the criteria of what made a chair a chair, look at the best sorted materials which I felt for me chair would possibly be layers of bamboo.

3D software

We had a session with levi during the second week of our first product where he taught us the basics of the CAD software solid works.
I enjoyed the task and found it quite easy, possibly because it was a step by step guide but it did make me feel more comfortable with the software and that I could approach trying to use it by myself within my own project.


I found making the lego brick and being able to see the final product from different angles and enjoyable session as it allowed me to appreciate what I made as well as realise I can create so much with the right CAD software and skills.

Beginning of 3D

We started the week by having a variety of materials. From these materials we were told to to create 15 new 3D objects from any of these materials. We had to use a minimum of three different materials.


I found it quite difficult making an abstract object so even though the task was to always use three objects I ended up using one object for this one. I still enjoyed looking at the shape as it could be looked at from different angles where you could see different lines and forms within the shape formed.

When I used the polypropylene I carved lines into the sheet to bend the once flat sheet and cut lines into  the material to make an actual shape.


This was one of my favourite objects that I created using cable ties, wood and tape.
I feel as though the shape is very fluid and in some ways reminded me of flower petals.
I was very pleased with the outcome of the shape and if put into further development I would have created the pattern all the way around to create a more circular pattern. I may have possibly used black and white to create  pattern within the pattern which would have been interesting to photograph with a bright light facing the object.


I created this object using paper that I carved into, wire and rope. I love the natural forms of curve that the object created and every time you picked  up the object and placed it back down the paper would fold in different way than it did before. I think all the materials complemented one another but I would probably use brighter lighting if done again.


I only used one material  when using the cable ties as I was trying to create a grid work. Although this did not happen when we later did further developments of our work I enjoyed employing this photograph within my work. I thought that the array of colour complemented one another well


I enjoyed making this object as a lot of it was made with the use of tension to make the object hold itself up as well as the use of tape. I like the geometric look of this object and variety of materials and if developed would see this becoming some type of shelving unit. 


Our next task was to print images of the objects we had made and develop them into actual products or architectural models either by using on or multiple of the objects in one sketch.

But prior to that we had to draw first hand drawings of 5 of our 15 objects using a variety of media that ranged depending on the object.


Monday 12 October 2015

Fashion - Reacting to Art, Garment Rotation

We started off the week by being asked to bring in photos of art that were abstract - that we liked. This was easy for me as I love abstract art and the abnormal so knew instantly why type of artists I'd be look at. One of the artists I chose to look at was Basquait. 
These are a few pieces of his work though I only referenced the piece below when making our 3D objects in the classroom. 
I focused on the repetition of his use of crowns with this piece of work and many others. Which led me to making my own 3D crown. 
I looked at other abstract images by an artists whose work I found very similar to Jackson Pollock's but more gentle and feminine - possibly to the use of a floral colour range. 
My reactions to these images were completely different to the reaction I had when looking/using Basquaits works to influence me. 
I really enjoyed these pieces of work because I initially found it hard coming up with concepts to make out card but once I did. I quickly applied myself to the task.